About Me

My photo
I have been a Stampin' Up Demonstrator for almost two years now, and when I signed up it was just for the starter kit and discount on products........ I never imagined it would snowball into being a business like it has. I am a new Mummy to my little boy, Isaac, who is almost four months old now. I am spending my maternity leave enjoying watch him grow up, becoming his own little person, and also trying to build my business up. Stampin' Up! have amazing products and I would love to share my crafting passion with as many people as possible. I am always putting through orders, so if you need anything, or just want some information or advise, please do not hesitate to contact me. If you want to try before you buy, then check out my classes and get booked on.

Wednesday 31 August 2011

August Card Class - Sail Away Card

This was one of my favourite cards of the five we made in class.  I usually struggle with cards for men, so was really pleased with this one.

Again I used the colour coach for inspiration - though the combo was meant to use Not Quite Navy, and I substituted with Baja Breeze instead.

The Sail Away stamp was inked in Early Espresso and stamped onto the Crumb Cake, plus a piece of Very Vanilla and Cherry Cobbler.  The sails were cut out of the Very Vanilla, and the boat cut from Cherry Cobbler, then both were glued to the image stamped on Crumb Cake.  The edges were distressed slightly with the wonderful Cutter Kit tool.
Another tool used for this card was the Crop-a-dile - how did I ever get on without one of these, they add so much to a card.  The ribbon was simply knotted and threaded through the Jumbo Eyelets and glued on the back to hold in place.  
The Cherry Cobbler Top Note layer was stuck down with Dimensionals to allow for the height the Jumbo Eyelets added.


You will have to excuse the line on the top left corner - during the class my card toppled over onto the Early Espresso ink pad!


The Details: 
Card / Paper - Crumb Cake / Cherry Cobbler / Baja Breeze DSP Subtles Stack / Very Vanilla
Stamps / Ink - Sail Away / Curly Cute / Early Espresso
Embellishments - 1/2" Crumb Cake Seaming Binding Ribbon / Jumbo Eyelets
Tools - Cutter Kit / Crop-a-dile / Stamp-a-ma-jig / Big Shot / Top Note Die / Dimensionals / Snail / Sticky Strip / Stampin Scrub and Mist / Paper Snips

Monday 29 August 2011

August Card Class - Flower Power Card

This post is the first of the five cards we made in my August card class.
I tried to make the class varied in the use of Stampin' Up! products, card themes and colours.

This card used a few punches plus the Big Shot with the Top Note Die.
I started by selecting the colour combo with the Colour Coach - I cannot praise this product enough.  One of the ladies at class ordered this product even though she doesn't have SU card stock in her stash, that speaks volumes for this products usefulness!!!

I started with a card base in Pumpkin Pie, layered with a square cut piece of Old Olive.  The Whisper White layer was cut with the Top Note, then you turn it 90 degrees and line it up and run it through the Big Shot again to get this square layer with perforated edge all the way round.  So simple yet effective!
The Rich Razzleberry layer is punched with the Fancy Flower Punch and then stamped in Rich Razzleberry ink with the circles image from the Confetti stamp set.  This is a great set for doing all kinds of backgrounds with six patterns to choose from.
I then used the 5 Petal Flower Punch with Pumpkin Pie card and sponge daubed the edges with pumpkin Pie ink.  This was layered on the card using Dimensionals and then a Designer Button from the brights collection was threaded with some Silver Elastic Cord and added with a Glue Dot.
The sentiment is from Afterthoughts (Level 1 Hostess) was inked in Rich Razzleberry and positioned using the Stamp-a-ma-jig.


This was quite a simple card with lots of different elements.  It would be really simple to re-create in a variety of colour combinations.

The Details: 
Card / Paper - Pumpkin Pie / Old Olive / Rich Razzleberry / Whisper White
Stamps / Ink - Afterthoughts (Level 1 Hostess) / Confetti / Pumpkin Pie / Rich Razzleberry
Embellishments - Designer Button / Silver Elastic Cord
Tools - Big Shot / Top Note Die / Fancy Flower Punch / 5 Petal Flower Punch / Stamp-a-ma-jig / Snail / Trimmer / Glue Dots / Dimensionals / Stampin Scrub and Mist / Sponge Dauber / Colour Coach

Sunday 28 August 2011

Very Sad News

I have been thinking over the past few days about posting an update, but it has been such a difficult time that I have kept putting it off.  Finally the time has come.

Very sadly my dear daddy passed away the Tuesday just gone.  He was diagnosed 12 weeks ago with cancer of the lung lining caused by asbestos exposure when he was a young man.  It is a devastating cancer for which there is no cure, and sadly none of the treatments my dad received seemed to work to give him more time.
Over the past 12 weeks we have gone through so many emotions, from shock and sadness to hope and joy, and everything in between.  In the end we spent lots of time remembering all of the fun and laughter of the good times we shared as a family, of which there were many.
I feel such sadness, but I know that my dad is now in a better place and no longer in any pain.

My brother and I are supporting each other and my mum through this very difficult time, with the love and support of our other half's, and the joy that is my 8 month old nephew.  I really don't know how we would have all coped this week had it not been for his laughter and joyous smile lighting up our days.


To those of you that have contacted me, the love and support that you have offered, the kindness you have shown, I thank you.............. 

I promised that I would share with you the cards from my August card class, so I have scheduled posts over the coming week with these cards.  Life will never be quite the same again, but I am sure that some sort of routine will establish itself over the coming weeks and months and I hope to get back to posting on my blog more regularly and getting back into challenges.

On a final note for now, I want to say thank you to my dad for teaching me what it is to be so brave and strong.  I will forever be inspired by you.

xxxxxxxxxxxxxxxxxxxxxxxxxxxxxxxxxxxxxxxxxxxxxxxxxxxxxxxxxxxxxxxxxxxxxxxxxxxxxxxxxxxxxxxxxx

Wednesday 17 August 2011

Bad Blogger

Hi everyone,

This is just a quick post to apologise for my lack of posts this past week or so.  Unfortunately my dad is very poorly and has been in hospital for over a week now.  Things are slowly improving, but it's just been a really tough time.  Keeping up with work, spending time with my family and making sure my mum is able to get to and from the hospital everyday is taking up most of my time.  The little time I have had to craft has been spent preparing for my card class this weekend.

I'm looking forward to having some time crafting with some lovely ladies both Saturday and Sunday, and have enjoyed preparing the five cards we will be making.
At least I know I will have some posts for next week as I will be sharing all of the cards with you.

Hopefully once my dad is back home, which we are hoping will be next week at the latest, then some sort of routine will be established and I will be able to blog on a slightly more regular basis.

Although it has been a terrible time, on the bright side I have been spending lots and lots of time with my parents which has been lovely.  I hope for some brighter times ahead for my dad.

I hope this post finds everyone well
Julie x

Sunday 7 August 2011

Somewhere over the rainbow

Good morning!

Today over at the Sweet Stampin Challenge Blog the theme is Rainbows.  This can be a card including rainbows, or colours from a rainbow.
I went with the later on my card today and I also went One Layer!

The card base is Confetti White, and then I stamped the images from Growing Green in Certainly Celery, Daffodil Delight, Pumpkin Pie and Real Red.  I used an Aqua Painter to blend the colours in each image slightly to give a water colour effect.  This card is quite well suited to having some water added and doesn't buckle easily, though don't drown the card in water :o)
The sentiment is from Curly Cute and was inked in Old Olive and placed using my Stamp-a-ma-jig, though I think it might be slightly wonky still!  That's my hand-eye co-ordination and placement though!!!!!!!!


Right, the sun is currently shining, so I'm off out to Kew Gardens.  I've not been before so am really looking forward to it :o)

Have a lovely Sunday...........

The Details: 
Card / Paper -  Confetti White
Stamps / Ink - Growing Green / Curly Cute / Old Olive / Certainly Celery / Daffodil Delight / Pumpkin Pie / Real Red
Embellishments - None
Tools - Stamp-a-ma-jig / Trimmer / Stampin Scrub and Mist

Saturday 6 August 2011

Piggy Birthday Time!

Hello,

I hope you have all had a lovely day!  I have spent the day with family and friends at an annual bbq some friends hold.  Lots of fun, laughter and bbq food made for a wonderful day out :o)

Tomorrow I am off the Kew Gardens with my OH and then meeting up with a friend who lives nearby for dinner.  I wanted to share with you the birthday card I made for her.
She loves pigs, so I got some ideas for Piggy Punch Art online and came up with this card:


The base is Marina Mist, sponge daubed around the edges - I can't stop daubing at the moment!
The grass is torn Pear Pizzaz, again daubed.  The fence is a strip of Textured Crumb Cake with the posts made from the Jewellery Tag Punch.
And the we come to the little piggy, so cute.............. all Pretty in Pink!
Body - 1 1/2" Circle from Circles # 2 Die
Head - 1" Circle
Nose - 3/8" Circle Punch from Itty Bitty Shapes Punch Pack
Ears - 5 Petal Flower Punch
Feet - Flower from Itty Bitty Shapes Punch Pack
Eyes - 2-Step Owl Punch in Early Espresso
Tail - 3/4" Circle Punch cut into a spiral.
Again, everything was dauber and the glued together.  I added accents of white and then popped him onto the card front with Dimensionals.
The sentiment is from Cute and Curly inked in Basic Gray.

I hope she's loves it as much as I do!

Friday 5 August 2011

August Flowers

Evening, 

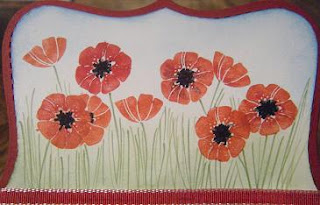
I been busy crafting in my hot, humid craft room to make a card for the Daring Cardmakers Challenge this week.  The first challenge of each month is based on the flower of the month, and for August it's Poppies and Gladioli................

Well, I had just the stamp in mind, which I've never even used before today.  Can you remember back to this years Stampin' Up! Sale-A-Bration????  Well, the lovely set called Punch Bunch had a stamp that looks very much like poppies........  However the stamped image is one flower front on and one from the side, so I had to use my trusty Stamp-a-ma-jig for this card.

I decided to go with an Easel Card format, made with the card cut with the Top Note Die (exclusive to Stampin' Up!)  The base is made from Green Garden and Cherry Cobbler card.  I also cut some Real Red DSP from the Brights Stack and some Whisper White with the Top Note and cut along the perforated line to make these slightly smaller.
Making up the card base was easy, some folds and a bit of red sticky and I was done.  The fun really started with the Whisper White card and getting the image I had in my head down.  
I started by using a Sponge Dauber or two to add some colour to the Whisper White.  The bottom was sponged very lightly in Pear Pizzazz and Garden Green, and the top in Bashful Blue.


I used markers to ink the large poppy flower head, Poppy Parade (of course!) plus some Real Red and Cherry Cobbler for highlights.  I stamped this and the smaller poppy image across the Whisper White.  I used the writing end of the Basic Black Marker to add dots to the flower centres, and then the writing end of a Pear Pizzazz and Wild Wasabi marker to add in some grass and stems.
Real Red 1/8" Taffeta Ribbon was then wrapped around the bottom before gluing it to the card front.
The sentiment is from the stamp set Oval All, inked with markers, stamped onto Whisper White and punched out.  I layered it onto a punched piece of Cherry Cobbler and attached with Dimensionals to act as a stopper for the card.

Here is a close up of my poppies :o)


I hope you like my creation today.  Feel free to leave a comment as I love to know what you think!

The Details: 
Card / Paper -  Cheery Cobbler / Garden Green / Whisper White / Real Red DSP Stack
Stamps / Ink - Punch Bunch (SAB retired) / Oval All / Basic Black / Pear Pizzazz / Garden Green / Wild Wasabi / Bashful Blue / Poppy Parade / Real Red / Cherry Cobbler
Embellishments - 1/8" Real red Taffeta Ribbon
Tools - Top Note Die / Big Shot / 1 3/4" x 7/8" Oval Punch / Scallop Oval Punch / Stamp-a-ma-jig / Sponge Daubers / Paper Snips / Red Sticky Strip / Dimensionals / Snail / Tombow / Trimmer / Stampin Scrub and Mist

NEW - Card Classes

Please note - this post will stay at the top of the page until 5th August - do scroll down for my latest posting.

Hi Everyone,

I am now doing monthly card classes at my home in Basingstoke.

If this is something you might be interested in, then take a look at the upcoming dates HERE

Alternatively, if Saturdays don't suit you, or you would rather I came to your home, then you could book a workshop and get a taster of what Stampin' Up! has to offer, while enjoying the company of your friends and having fun with a make and take card or project.

Another alternative is getting a group of friends together and I can come to your home and run the card class.  I provide all of the things you need to make the cards, with the exception of glue.  You just have to provide the drinks and nibbles :o)

Contact me if you have any questions or to make a booking - craftybugjules@yahoo.co.uk

Thursday 4 August 2011

Autumn Trendy Trees

I realise it seems like we have only just had a taster of summer, but the card I have to share with you today has rather an autumnal feel to it.

The layout is based on a sketch from Try Stampin On Tuesday.
I grabbed the trusty Colour Coach and set about making my card with the combo Cherry Cobbler / Pumpkin Pie and Night of Navy.  I threw in Whisper White as a neutral, and a little Daffodil Delight as well :o)


The base is Night of Navy which I have stamped with the circle tree top image from Trendy Trees in Whisper White.  I layered some polka dot Pumpkin Pie DSP from the Brights Stack, onto some Whisper White Textured  card and sponge daubed the edges in Pumpkin Pie.  The main focus is the Whisper White panel, edges sponge daubed in Cherry Cobbler with the three Trendy tree images stamped onto it.  
I used the Stamp-a-ma-jig for positioning.  I couldn't live without this tool!
I stamped the three tree trunks first in Early Espresso.  The middle image is inked in Pumpkin Pie and then I coloured the edge with a Cherry Cobbler Marker.  
The two outer trees are inked in Daffodil Delight and then I used the Thumping technique to add Pumpkin Pie and Cherry Cobbler.  You basically colour an image in the lightest colour, then use the marker of the next lightest colour and drum it up and down onto the image randomly.  Then repeat with the next colour and so on........  I've photographed a close up of each so you can really see how gorgeous the trees look.  The outer trees especially look like the leaves are about to start falling!
This is all layered on Textured Cherry Cobbler card.  The sentiment is inked in Pumpkin Pie and the punched with the Decorative Label Punch and again layered onto Textured Cherry Cobbler card.


Maybe you can have a go at Thumping too next time your crafting stash is out!

The Details: 
Card / Paper - Night of Navy / Cherry Cobbler / Whisper White / Pumpkin Pie DSP Stack
Stamps / Ink - Trendy Trees / Cherry Cobbler / Pumpkin Pie / Whisper White / Daffodil Delight / Early Espresso
Embellishments -  None
Tools - Decorative Label Punch / Sponge Daubers / Snail / Stamp-a-ma-jig / Stampin Scrub and Mist / Colour Coach / Trimmer

Tuesday 2 August 2011

Colour Combo Card

Oh my goodness, I can't believe it's Tuesday already!  I was just about to write Monday and realised that had already passed.............  it's really true that time goes faster as you get older!

Today I have a card to show you that I made for the Colour Q Challenge

Lucky Limeade is a new In Colour from Stampin' Up! that they USA had in their new catalogue.  It's yet to arrive in the UK, so I substituted with Old Olive which is similar but slightly darker.


I used Basic Gray for the card base.  The second layer is Textured Whisper White which I have embossed using the Big Shot and Vintage Wallpaper Embossing Folder.  Before putting the card into the embossing folder I used a Brayer to add Bashful Blue ink to show on the debossed side.
This has been mounted with edges in Tempting Turquoise punched with the Eyelet Border Punch.
The sentiment is from So Happy For You (Retired SAB) inked in Tempting Turquoise and stamped into the Four Frames image already stamped in Old Olive ink.  This was cut out with the Decorative Label Punch and edged in Tempting Turquoise card.  I popped it onto the center of the card with Dimensionals, and added two Old Olive Designer Buttons to the embossed background.


I kind of feel like there's something missing - it's not quite right!  Maybe I'll have another go tomorrow :o)

The Details: 
Card / Paper - Basic Gray / Tempting Turquoise / Whisper White Textured and Smooth
Stamps / Ink - Bashful Blue / Old Olive / Tempting Turquoise / Four Frames / So Happy For You (Retired SAB)
Embellishments -  Designer Buttons
Tools - Decorative Label Punch / Vintage Wallpaper Embossing Folder / Eyelet Border Punch / Dimensionals / Snail / Tombow / Glue Dots / Trimmer / Stampin Scrub and Mist