About Me

My photo
I have been a Stampin' Up Demonstrator for almost two years now, and when I signed up it was just for the starter kit and discount on products........ I never imagined it would snowball into being a business like it has. I am a new Mummy to my little boy, Isaac, who is almost four months old now. I am spending my maternity leave enjoying watch him grow up, becoming his own little person, and also trying to build my business up. Stampin' Up! have amazing products and I would love to share my crafting passion with as many people as possible. I am always putting through orders, so if you need anything, or just want some information or advise, please do not hesitate to contact me. If you want to try before you buy, then check out my classes and get booked on.

Thursday 30 June 2011

Congratulations!

Is it me, or does there seem to be lots and lots of pregnant ladies out there at the moment?
Three people I know are pregnant at the moment, with one about to drop any day now!  And everywhere I go there are bumps around........
One of the lovely ladies I work with has just found out her friend is expecting, so she asked me to make a card to send her.

I thought I'd give the Baby Grow card a go.  I've seen lots of these cards on various sites and think they are so cute.  


I used Nursery Suite DSP for the edging, and went with the So Saffron colouring as this is a great neutral colour.  I used Whisper White to make an A6 card base and used the Perfect Polka Dots Embossing Folder to give it a lovely texture.  I then cut the sides in at an angle and used the 1 3/8" circle punch to make the leg holes and the neck line.  I used the same punch on the DSP and then used the 1 3/4" Scallop Circle Punch to get scalloped rings to stick onto the card.  The little duck comes from the Every Little Bit stamp set, inked in So Saffron and I used the Aqua Painter to colour it in lightly.  Too much water makes the Whisper White card bobble, so use as little as possible just to get a smudge of colour.  This was punched and mounted.
I also added a sentiment inside as well, but forgot to take a picture of this.  It was from the Bundle of Love stamp set.

I hope your friend likes the card Dee Dee :o)

The Details: 
Card / Paper - Whisper White / Nursery Suite DSP
Stamps / Ink - Bundle of Love / Every Little Bit / So Saffron
Embellishments - None
Tools -Aqua Painter / 1 3/8" Circle Punch / 1 3/4" Scallop Circle Punch / Trimmer / 2-Way Glue / Dimensionals / Perfect Polka Dot Embossing Folder

Wednesday 29 June 2011

Square Flowers!

Hello everyone - just a quick card today :o)

I used the trusty Colour Coach to get the combo of Real Red, Pumpkin Pie and Early Espresso.
I used the Ornate Flowers stamp set and stamped one of the flowers in Real Red and Pumpkin Pie all over a piece of Whisper White card.  I then cut this into small squares which a stuck down onto a piece of Early Espresso.  This was mounted onto a card base of Pumpkin Pie.
Finally I stamped the same image in Real Red onto Whisper White, adding a sentiment from Tiny Tags in Early Espresso.  This was mounted onto Pumpkin Pie and then added to the card with Dimensionals.
Voila - a really quick and easy one today!


Thanks for visiting :o)

The Details: 
Card / Paper - Pumpkin Pie / Early Espresso / Whisper White
Stamps / Ink - Ornate Flowers / Tiny Tags / Real Red / Pumpkin Pie / Early Espresso
Embellishments - None
Tools - Trimmer / Stamp-a-ma-jig / Snail / Dimensionals / Stampin Scrub and Mist

Tuesday 28 June 2011

Paper Players Challenge # 53 - Growing Green

Good Morning!

I decided to try out a few different techniques while making this card for the Paper Players Challenge this week.  Yet another sketch challenge - it seems to be the week for sketches!

I went with a Very Vanilla card base, and then cut some Soft Suede and Melon Mambo pieces of card.
I thought the Growing Green stamp set would lend itself very well to using with bleach - yes, you heard right, bleach!  
You have to be very careful when doing this and work pretty swiftly.  I put some folded up kitchen towel on a small plate and poured on some bleach so it saturates the kitchen towel.  Press your stamp into the kitchen towel and stamp immediately onto the card.  Depending on the colour card you use, you get different colours coming through where the bleach hits the card.  You must press down firmly, and then keep going until the card is covered with the desired image.  Wash the stamp right away!  Be careful not to spill any of the bleach as well :o)


This effect on Soft Suede gives a lovely golden brown colour, whilst on the Melon Mambo is came through almost white.

I then stamped some of the images with Versamark onto Water Colour Paper.  I added white embossing powder and heat set this with my heat gun.  I used my Aqua Painter to then colour the flowers in with Melon Mambo ink.  These were cut out and mounted onto the card front with Dimensionals.  The sentiment is from Afterthoughts (Level 1 Hostess) stamped in Soft Suede.

Rather a mixed bag card, but I actually really like it.  Half way through making it, that was in dispute, but it turned out better than I thought.

Please leave me a comment and let me know what you think.........
If you would be interested in learning how to do these techniques, or if you've fallen in love with the Growing Green stamp set, then contact me HERE

The Details: 
Card / Paper - Very Vanilla / Soft Suede / Melon Mambo / Water Colour Paper
Stamps / Ink - Growing Green / Afterthoughts (Level 1 Hostess) / Soft Suede / Melon Mambo / Versmark
Embellishments - None
Tools - White Embossing Powder / Bleach / Paper Snips / Dimensionals / Snail / Trimmer / Stampin Scrub and Mist / Stamp-a-ma-jig

Monday 27 June 2011

Stamping 411 - Sketch

When I saw this weeks Stamping 411 Sketch I couldn't wait to get started.
Straight away I knew I wanted to work with my Embossing Folders and I included three different ones on the card I made.


The first section (top left) was a piece of Lap of Luxury DSP that I ran through the Perfect Polka Dots Embossing Folder.  The second section (top right) was Very Vanilla card that I ran through the Lattice Square Embossing Folder.  I used my brayer first to ink the raised cross pattern on the embossing folder in Concord Crush ink.  I love this effect, though I did end up with inky fingers!
The bottom section was Very Vanilla card run through the Elegant Bouquet Embossing Folder and then I used a sponge dauber with Concord Crush ink the highlight the raised image.
I finally finished it all off my stamping the friends image from Cute by the Inch (Level 2 Hostess) in Concord Crush, punching it out with 1 1/4" Square Punch and mounting it on a piece of Pretty in Pink punched with the 1 1/2" Scallop Square.Everything was mounted onto a Pretty in Pink card base, the sentiment was added with Dimensionals.

The Details: 
Card / Paper - Pretty in Pink / Very Vanilla
Stamps / Ink - Cute by the Inch (Level 2 Hostess) / Concord Crush
Embellishments - None
Tools - Lattice Square, Perfect Polka Dot, Elegant Bouquet Embossing Folders / 1 1/4" Square Punch / 1 1/2" Scallop Square Punch / Sponge Dauber / 2-Way Glue / Dimensionals / Trimmer / Stampin Scrub and Mist

Sunday 26 June 2011

Vintage Vogue Flowers

Hello,

I hope you are all enjoying the fabulous sunshine that has finally emerged!?!?!?
My laptop is set up in the conservatory, so it's really hot in here.  This post will be a quick one!

I just wanted to show you the card I made for the Less is More Challenge this week.
I decided to grab my Vintage Vogue stamp set and try some masking to make the circles in this weeks sketch.
I knew I wanted to use Sahara Sand as the card base, and then looked to my Colour Coach to pick the other colours Bravo Burgundy and Pink Pirouette.  I used Pear Pizzazz as well, for the leafy stamp.


I punched circles of post-it note with 1 3/8" Circle Punch, placed them onto the Sahara Sand card base and then stamped the leaf image over the top.  I removed the masking and then inked up the flower from Vintage Vogue in Pink Pirouette and then did the rock and roll technique to get an outer layer of Bravo Burgundy on the stamp.  I used my Stamp-a-ma-jig to position the flowers correctly inside the circles.

Right, time to get out of the conservatory and get a nice cold drink :o)

The Details: 
Card / Paper - Sahara Sand
Stamps / Ink - Vintage Vogue / Bravo Burgundy / Pink Pirouette / Pear Pizzazz
Embellishments - None
Tools - 1 3/8" Circle Punch / Stamp-a-ma-jig / Trimmer / Stampin Scrub and Mist

Saturday 25 June 2011

My Birthday Card for Rachel

Finally we are on to the card I made for Rachel from me and my OH.
I went pink, pink,pink with this one and thought she'd love butterflies :o)


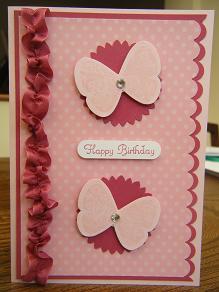
The card base is Pink Pirouette and I mounted Rose Red card and Pretty in Pink DSP on top with a Scalloped Border Punched edge.  I double punched Rose Red card with the 1 3/4" Scallop Circle Punch.  The butterflies are from the Butterfly Prints stamp set and are inked in Pink Pirouette also.  The effect is very subtle.  I added some sparkle with a big Basic Rhinestone on each butterfly.
I did this lovely effect with the ribbon by fraying one end and then grabbing a couple of threads and pulling on them.  This gathers the ribbon together so you just have to push the gathering down the ribbon and keep going pulling until you have the length of gathered ribbon you need.  It's stuck down using sticky strip.
The sentiment is actually from the USA Stampin' Up! set called Create a Cupcake.  I really hope we get this in the 2011/2012 catty - I have my fingers crossed :o)

Right, that's it for today.  I'm off to meet Hayley Gillie and discuss the stall I'm helping out with next weekend at the ArtStamp show at Newbury Race Course.  If you live nearby, pop along and see what wonderful Stampin' Up! products and cards are on display and take part in a make and take project as well.
I'm really looking forward to it!

The Details: 
Card / Paper -  Rose Red / Pink Pirouette / Whisper White / Pretty in Pink DSP
Stamps / Ink - Create a Cupcake (USA only) / Butterfly Prints / Rose Red / Pink Pirouette
Embellishments - Basic Rhinestones / 1/2" Rose Red Seam Binding Ribbon
Tools - Scallop Border Punch / Butterfly Punch / 1 3/4" Scallop Circle Punch / Word Window Punch / Sticky Strip / Snail / Dimensionals / Trimmer / Stampin Scrub and Mist

Friday 24 June 2011

Happy Birthday Rachel - card number two!

So today I'm going to show you the card I made for my brother, his girlfriend and little baby Ethan to give Rachel.  
I kept with the punch art theme!  I'm loving using punches in this way.
A few months back I purchased a punch art tutorial called In The Garden from a very talented lady called Kim Score.  If you love punch art, then check out her blog, she's come up with so many wonderful creations.
So I am going to work through all six of the tutorials I purchased, but I thought I'd start with the Bumble Bee.


Isn't he just the cutest little flower delivery guy you've ever seen?
This is mostly made from the 2-Step Bird Punch along with a few Circle Punches and the Itty Bitty Shapes Flower Punch.
Pretty quick and simple if you know how..........
I mounted the little guy on Melon Mambo card base, with Pumkin Pie backing to the sentiment.  This was stamped in Melon Mambo using the Curly Cute stamp set and the little cupcake is from Itty Bitty Bits.


The Details: 
Card / Paper - Melon Mambo / Pumpkin Pie / Whisper White
Stamps / Ink -Curly Cute / Itty Bitty Bits / Melon Mambo
Embellishments - None
Tools - Scallop Border Punch/ Decorative Label Punch / Circle Punches / 2-Step Bird Punch / Trimmer / Stampin Scrub and Mist / Dimensionals / 2-Way Glue

Thursday 23 June 2011

Happy Birthday Rachel!

It's my lovely Niece's birthday today.  I'm really hoping she'll love this card as it was a really tough one.
Obviously I had to make her a card from myself and my other half, but then I also got asked to make cards for Rachel by my mum and also my brother.

This card is what I created for my mum to give to her.  My mum asked if I could do something related to horses!!!!  Well, I'm not one to step away from a challenge.  I do however have to own up - I did not come up with this idea, it's something I got from a blog by a lady called Lynn Pratt.


In all fairness, the actual card didn't take long to make, it was just working out what punches to use for all of the elements.  The snout of the horse (it's probably called something completely different!) was meant to be the Wide Oval Punch, but I don't have that and the smaller oval really wasn't right, so I had to improvise.
I used tracing paper and drew round the Wide Oval Punch in the IB&C, then cut it out and used it to draw round onto the River Rock card.  It's not perfect like if it were punched out, but not half bad I didn't think!

Happy Birthday Rachel - enjoy your day :o)

Check back soon as I'll be doing a punch art piggy card for a friends birthday in August!

The Details: 
Card / Paper - Soft Suede / River Rock / Basic Black / Whisper White
Stamps / Ink - Soft Suede
Embellishments - Black Brads
Tools - White Gel Pen / Circle Punches Galore!!!! / 5 Petal Flower Punch / Sponge Daubers Dimensionals / 2-Way Glue

Wednesday 22 June 2011

Quilting Technique

Hello!

I wanted to try something a bit different on a card for the sketch over at The Paper Players this week.
The sketch was nice and basic, so I wanted to jazz it up a bit, so thought I'd give Paper Strip Quilting a go.

What is Paper Strip Quilting I hear you ask?  Well take a look..............


Cut a piece of card to 1" square, then from three different pattern DSP cut strips of 3/8".
Cut a backing piece of card to 3 1/2" square and stick the 1" piece in the centre.  Take a strip of paper and glue it down along one edge and work your way round the 1" square until all four side are done, then move on to the next piece of DSP and glue down to make the next layer.  Continue until the backing card is totally covered, and then trim away the overhang.  
I mounted this onto some Basic Black card and glued it to a card base of Rose Red Textured Card.
The butterfly is cut using the Beautiful Wings Embosslit, and the sentiment is from Curly Cute.  I added a Basic Rhinestone for some girly bling!  :o)

The Details: 
Card / Paper - Rose Red Textured / Very Vanilla / Basic Black / Sweet and Sour Speciality DSP
Stamps / Ink - Curly Cute / Basic Black
Embellishments - Basic Rhinestone
Tools - Beautiful Wings Embosslit / Stamp-a-ma-jig / Trimmer / 2-Way Glue / Snail / Stampin Scrub and Mist

Tuesday 21 June 2011

My First Gift Card Holder

Hi everyone!  How is Tuesday treating you so far?  Good I hope.

I wanted to share with you a gift card holder that I made all by myself, no tutorial, no template.  Probably not the most difficult of tasks, but I was pretty pleased with it.
It came about because I recently ordered the Scallop Envelope Sizzix Die, which I knew was only small, but I was disappointed to find that is was only a few millimeters short of fitting a gift card :o(  I should have checked this out before ordering it maybe!

So, time to sort one out for myself.
I cut a piece of textured Concord Crush card to 23cm by 9cm, then scored at 1cm and 12cm along the longest side.  Fold and run the Bone Folder over these, then run a length of Sticky Strip along the 1cm tab and fold round and stick down.  I enclosed the bottom by popping in two Eyelets with my Crop-o-dile, and then tied some 1/2" Pear Pizzazz Seam Binding Ribbon through the holes.  I used the 1" punch on the top edge to make a grab hole.  I used Pear Pizzazz cut 10cm by 7.5cm for the insert, and using the gift card as a guide cut two slits at opposite corners to hold the gift card in place.  I topped it off with one of the Four Frames stamped images with a sentiment from So Happy For You, a retired SAB set, and punched it out with the Decorative Label Punch.
A pretty quick and useful make.  It adds a nice personal touch to something which can sometimes be seen as a non-personal gift, though sometimes gift cards are the only way to go :o)


I hope you find this item and my (hopefully understandable) instructions of use to you.
Let me know what you think of my creation by leaving a comment below - and if you'd like to have a workshop in your home, then this is one of the projects we can make along with some cards.  Just email me for information at craftybugjules@yahoo.co.uk

The Details: 
Card / Paper - Concord Crush Textured / Pear Pizzazz / Whisper White
Stamps / Ink -Four Frames / So Happy For You (retired SAB) / Pear Pizzazz / Concord Crush
Embellishments - 1/2" Pear Pizzazz Seam Binding Ribbon / Small Eyelets
Tools - Crop-o-dile / Decorative Label Punch / 1" Circle Punch / Bone Folder / Stamp-a-ma-jig / Trimmer / Stampin Scrub and Mist

Monday 20 June 2011

Monkey Madness!!!!

Hi everyone - I wanted to share with you a card I have made for the Stamping 411 Saturday Sketch Challenge this week.

I went a bit monkey mad and ended up stamping some Fox and Friends monkeys in Rose Red and cutting them out.  A little fiddly, but fairly quick to do.  It's just the tail that gets in the way a bit, but thankfully I didn't accidentally chop any off!  
I used Pear Pizazz DSP (level 1 hostess reward) for a leafy backdrop, and also stamped onto some Crumb Cake card with the leaves from the Confetti stamp set, in Versamark.  The branches are cut in Pear Pizazz from the 2-Step Bird Punch.


They are definitely some playful little monkeys, hanging out in the trees!

The Details: 
Card / Paper - Rose Red / Crumb Cake / Whisper White / Pear Pizzazz DSP (L1 Hostess)
Stamps / Ink - Fox and Friends / Afterthoughts (L1 Hostess) / Plane and Simple / Confetti / Versamark / Rose Red
Embellishments -  1/2" Rose Red Seam Binding Ribbon
Tools - 2-Step Bird Punch / 1 1/2" Scallop Square Punch / Sticky Strip / Stamp-a-ma-jig / Snail / Dimensionals

Sunday 19 June 2011

Happy Fathers Day!

I have been waiting to post these cards on my blog for three weeks.
Now it's Father's Day I can put them up as the originals have all been received!
The first card I made for my brother, his girlfriend and my gorgeous nephew to give to my lovely dad.
He's got a big fish pond in the garden and loves his fish, so having seen the Build a Blossom stamp set used to make various fishy cards on the Internet, I thought I'd have a go too.


I used the Just Believe stamp set to get the foliage, and the sentiment is from Something to Celebrate (Level 2 Hostess) - much used by me!!!!

The second card is for my brother (his first Fathers Day!) from my lovely 5 month old nephew Ethan.
I wanted to go with something simple and quite child like, so CASE'd a design I'd seen on the Internet some times ago - really sorry, but can't remember who's design it was........
I used various punches to put together a little sailing boat, added in some little hearts cut from DSP and the sentiment is again from Something to Celebrate.


I really hope everyone likes the Fathers Day cards I made.  I certainly enjoyed making them all.  It was quite a challenge making so many and trying to make them all different, especially as boys cards are something I find pretty tough.  

The Details: 
Card / Paper - Sahara Sand / Pear Pizzazz Smooth and DSP / Peach Parfait / Whisper White / So Saffron Smooth and DSP / Bashful Blue
Stamps / Ink - Build a Blossom / Something to Celebrate (Level 2 Hostess) / Just Believe / Pear Pizzazz / Peach Parfait / So Saffron / Certainly Celery
Embellishments -  Bitty Button / Basic Rhinestones / 1/2" Pear Pizzazz Seam Binding Ribbon
Tools - Lattice Square Embossing Folder / 1 1/2" Scallop Square Punch / 1 3/8" Circle Punch / Small Heart Punch / 1 3/4" x 7/8" Oval Punch / Scallop Oval Punch / Trimmer / Stampin Scrub and Mist / Snail / Sticky Strip / Dimensionals

Saturday 18 June 2011

Weekend Catch Up.........

Oh my goodness!  Where did the week go?
Between visiting family, doing mid-week washing so my other half could pack for a work trip, and then feeling poorly yesterday, I've not had chance to get to my craft room.  I fully intend to make up for that today, so hopefully I won't be missing a day of posting in the coming week.

So, Saturday, it's a big challenge day with lots going on.

First I wanted to share with you a card I have made for my sister-in-law's Dad for his birthday in July.
She said he liked boats, so out came the a la carte stamp, Sail Away.
I also thought I'd give my brayer a go on a background scene.


I used Pearch Parfait and So Saffron for the sunset section and Not Quite Navy and Marina Mist for the sea.  I also daubed Whisper White across the sunset for some clouds and across the water to give some deepth.  
The boat is stamped in Basic Gray onto the brayered background, and also on some scrap Whisper White.  I cut the sails out of the scrap peice and glued them on which really made the whole scene come to life.
The sentiment and decoration at the bottom of the card is from the Plane and Simple stamp set.  This sin't one I ever thought I'd buy, but having seen a few creations on various blogs using this set, I had to get it.  It's fabulous for male card, but also so much more.

I'm entering this card into the Simply Stampin' Challenge this week.  It's entitled - You've Got Male!

The Details: 
Card / Paper - Glossy White / Whisper White / Sahara Sand
Stamps / Ink - Sail Away / Plane and Simple / So Saffron / Peach Parfait / Not Quite Navy / Marina Mist / Basic Gray / Whisper White
Embellishments - None
Tools - White Gel Pen / Sponge Daubers / Brayer / Stamp-a-ma-jig / Snail / 2-way Glue / Trimmer / Stampin Scrub and Mist

Having enjoyed using my brayer, I decided to keep it out and make full use of the Plane and Simple stamp set, but doing a scene with the plane from the set.
This time I brayered the sky in Bashful Blue, adding in Whisper White clouds with a dauber.  I also daubed the bottom of the glossy card in Pear Pizzazz and Wild Wasabi to create a tree line.
The plane was stamped in Soft Suede.


I'm entering this card into the Sweet Stampin Challenge. This week it's entitled - Things With Wings!

The Details: 
Card / Paper - Glossy White / Whisper White / Marina Mist
Stamps / Ink - Plane and Simple / Bashful Blue / Whisper White / Soft Suede / Pear Pizzazz / Wild Wasabi
Embellishments - None
Tools - White Gel Pen / Sponge Daubers / Brayer / Stamp-a-ma-jig / Snail / 2-way Glue / Trimmer / Stampin Scrub and Mist

Monday 13 June 2011

Mojo Monday - on a Monday!

Whooo hoooo........  I actually found time to craft tonight and get my Mojo Monday card done on Monday!

I found it quite a tough one for some reason this week.  I'm not 100% convinced I even like the card, but you have to try new things and learn along the way :o)

You can view the sketch for this week here

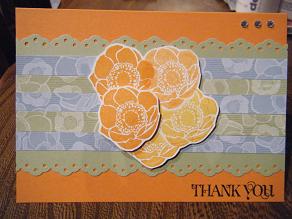
I went with the Greenhouse Gala DSP and took the colours Pumpkin Pie, Daffodil Delight, Pear Pizzazz and Baja Breeze from the DSP.
I used strips of the small flower print to lay across the card base, edged with Pear Pizzazz card punched with the Eyelet Border.  I then gave masking a go with one of the stamps from the Ornate Flowers set.  I stamped the images in a circular pattern and cut them out.  I also cut out a singular flower and mounted both of these elements onto the card with dimensionals to give some interest to the card.  The sentiment is in Basic Black from the Curly Cute stamp set.  For a little extra touch I added the three Basic Rhinestones in the top right as suggested in the sketch.


Viola.......... does it work?  Let me know what you think!

The Details:
Card / Paper - Pumpkin Pie / Pear Pizzazz / Whisper White / Greenhouse Gala DSP
Stamps / Ink - Ornate Flowers / Curly Cute / Pumpkin Pie / Daffodil Delight / Basic Black
Embellishments - Basic Rhinestones
Tools - Eyelet Border Punch / Trimmer / Paper Snips / Dimensionals / 2-way Glue / Stampin Scrub and Mist

Sunday 12 June 2011

CAS-ual Friday - New Challenge

Hi there,

I happened to stop by the CAS-ual Fridays challenge blog this week and took a fancy to the challenge they had displayed.  It was a tic-tac-toe board and the idea was to pick three elements from it, either in a straight line, across or down, or diagonally.  The elements were chipboard, gems, emboss, ribbon, die or punch, felt, buttons, flowers and twine.  I went with a straight line down the middle - gems, punch and flowers!

I used some SAB favourites of mine, So Happy For You and Sweet Summer - sadly now retired :o(
I grabbed the lovely In Colour card stock and ink pads and set to work to create this card:


I made the scallop border using the 1 1/2" Scallop Square Punch, working it across the edge of the Pear Pizzazz card.  It gives the opposite cut effect to the Scallop Border Punch, which I don't yet own.
I added some Basic Rhinestones to the flower centres for that added Bling!

The Details: 
Card / Paper - Whisper White / Peach Parfait / Pear Pizzazz
Stamps / Ink - So Happy For You / Sweet Summer / Peach Parfait / Pear Pizzazz / Blushing Bride
Embellishments - Basic Rhinestones
Tools - Trimmer / 1 1/2" Scallop Square Punch / Snail / Stampin Scrub and Mist

Saturday 11 June 2011

Less Is More - Super Swift

This week the Less Is More challenge is a One Layer Card entitled In The Frame!
I didn't have much time to get this one done so wanted something quick and simple.  
I fully utilised my Stamp-a-ma-jig for this one!  Using the scroll stamp from the Strength and Hope stamp set I made a frame on Whisper White in Poppy Parade Ink.  I added the Just For You sentiment from the Afterthoughts (Level 1 Hostess) stamp set in the centre of the frame, simply stamped in Basic Black.


Quick and Simple - I hope you like it!  Let me know by leaving a comment below.

Thanks for stopping by 
x

The Details: 
Card / Paper - Whisper White
Stamps / Ink - Strength and Hope / Afterthoughts (Level 1 Hostess) / Poppy Parade / Basic Black
Embellishments - None
Tools - Stamp-a-ma-jig / Trimmer / Stampin Scrub and mist

ILWS - Swaps Galore - part 2

Just a quick post to show you all the lovely cards I got sent back for the In Love With Stamping (ILWS) Favourite Stamp Set swap.

Some great cards, fab ideas and good for inspiration :o)

Friday 10 June 2011

Just Add Black and White

Black and White is the colour theme for the Just Add Ink challenge this week.
Very simple and elegant, which is how I wanted my card to look. 
I think I have achieved that, though without my stamp-a-ma-jig I think it wouldn't have turned out so well!
Those little Cute by the Inch stamps are exactly as the name suggests, CUTE!


Swing by the Just Add Ink site and check out every ones entries.  It's a great way to find inspiration......

The Details:
Card / Paper - Basic Black / Whisper White
Stamps / Ink - Curly Cute / Cute by the Inch (Level 1 Hostess) / Basic Black / Whisper White
Embellishments - None
Tools - Stamp-a-ma-jig / Eyelet Border Punch / Trimmer / Stampin Scrub and Mist

Thursday 9 June 2011

Mojo Monday Time!

Hey everyone!  

Yes, it's Thursday, but I've only just got around to taking a picture of my Mojo Monday card for this week.
I loved the sketch they posted up this week, take a look HERE

I went right for the In Colours, and used every single one on this card.  I made full use of the In Colour DSP which is a Level 1 Hostess product, host a workshop and you can get this item too.......

I used Peach Parfait as the card base, with a mount of Concord Crush.  I added panels of DSP and the scalloped edge at the bottom is actually the DSP punch with the 1" Circle Punch and stuck under the Concord Crush strip.  I finished it off with some Pear Pizzazz Seam Binding Ribbon and the sentiment from Afterthoughts, another Level 1 Hostess product.  I used markers to ink it in Poppy Parade and Concord Crush, then punched it with the 1 3/4" Scallop Circle.


I hope you like it!  Let me know............

The Details: 
Card / Paper -Peach Parfait / Concord Crush / Whisper White / In Colour DSP (Level 1 Hostess)
Stamps / Ink - Afterthoughts (Level 1 Hostess) / Poppy Parade / Concord Crush
Embellishments - Pear Pizzazz Seam Binding Ribbon
Tools - 1" Circle Punch / 1 3/4" Scallop Circle Punch / Dimensionals / 2-way Glue / Trimmer / Stampin Scrub and Mist

Wednesday 8 June 2011

Birthday Cake Card

I wanted to post a quick card that I made using the Fun and Fast Notes stamp set.

I decided to go with lots of circles for the background, all cut from the Nursery Suite DSP.
I kept with the subtle colours and used So Saffron for the card base, which I ran through the Perfect polka Dot Embossing Folder, and the circles were mounted on Pear Pizzazz card.
I used markers to ink the stamped image so I could get a variety of colours, and then used the Blender Pen to make the cake frosting pinkilicious!!!!  Yum, Yum.........


The Details: 
Card / Paper - Whisper White / So Saffron / Pear Pizzazz / Nursery Suite DSP
Stamps / Ink - Fun and Fast Notes / Chocolate Chip / Regal Rose / So Saffron
Embellishments - None
Tools - Perfect Polka Dots Embossing Folder / 1" Circle Punch / 1 1/4" Circle Punch / 2-way Glue / Trimmer / Stampin Scrub and Mist

Tuesday 7 June 2011

ILWS - Swaps Galore!

I did my first swaps a few weeks ago when I went to Team Training, and I think it is a fabulous way to get new ideas and inspiration, and also to see how stamp sets I may not own can be used.
In Love With Stamping (ILWS) is a forum site for card crafts, mostly Stampin' Up! related, but not always.

Well a lovely lady started a thread to see if anyone was interested in doing a swap of cards from your favourite stamp set, so I grabbed the opportunity and signed up.  I went with Fox and Friends, it a one of my favourites and I always think it works brilliantly with the Brights colour family.

We had to make 10 full cards not just the card fronts, send them to the lovely Linda, who grabs one of each and posts 10 different ones back to everyone.  Simple!

Here's the cards I made - all lined up!

I picked out five of the animals in the set and five of the Brights colour family.
The base card for all of them is Textured Crumb Cake and I also added some 1/4" Early Espresso Grosgrain Ribbon to each of them.


Here's one close up.


I love the look you get with the Square Lattice Embossing Folder.
I'll post a picture of the swaps I get back, hopefully in the next week or so :o)

Please let me know what you think by popping a comment at the bottom of this post.  It's lovely to read everyones comments.

The Details: 
Card / Paper - Brights DSP / Crumb Cake Textured / Whisper White / Tempting Turquoise / Rich Razzleberry / Daffodil Delight / Old Olive / Pumpkin Pie
Stamps / Ink - Fox and Friends / Something to Celebrate (Level 2 Hostess) / Tempting Turquoise / Rich Razzleberry / Daffodil Delight / Old Olive / Pumpkin Pie
Embellishments - 1/4" Early Espresso Grosgrain Ribbon
Tools - 1 3/4" x 7/8" Oval Punch / Scallop Oval Punch / Sticky Strip / Dimensionals / Snail / Stampin Scrub and Mist / Trimmer / Square Lattice Embossing Folder

Monday 6 June 2011

Anniversary - take two!

As well as the Anniversary card I made for my brother and his girlfriend from me, I was also asked to make one for my brother to receive from Alex.  I obviously wanted it to be completely different to the one I'd made for them both, so I used the Internet to search for ideas and ended up using the Two-Step Bird Punch for this one.
This punch is amazing!  Like the owl punch it has so many uses, though I stuck with it's primary function as a bird.

I decided to use the Springtime Vintage DSP from the mini catalogue, though I only used a small strip of it.  However, I did use the colours from this paper stack to form the basis of the card.  Rose Red, Pear Pizzazz and Crumb Cake, plus some Whisper White.
I punched out a couple of birds in Rose Red and dauber the edges with the same colour ink.  The hearts were punched from Rose Red card also with the Small Heart Punch, and again daubed with ink on the edges.

The sentiment is from a retired stamp set called Sealed with a Kiss.  I really love this script writing with the heart linking the words.  It's such a shame it was retired at the end of the last catalogue.


The hearts and the bird wings were all popped onto the card with Dimensionals to prevent the card looking to flat.  I think it's a really cute card and hope that Alex is pleased with ti as well.
What do you think? - let me know by leaving a comment below.........

The Details: 
Card / Paper - Whisper White / Rose Red / Crumb Cake textured / Pear Pizzazz smooth and textured / Springtime Vintage DSP
Stamps / Ink - Sealed with a Kiss (retired) / Rose Red
Embellishments - None
Tools - Word Window Punch / Two-Step Bird Punch / Small Heart Punch / Dimensionals / Trimmer / Daubers / 2-Way Glue / Stampin Scrub and Mist

Sunday 5 June 2011

Happy Anniversary my lovlies.......

Today I wanted to show you the card I have sent my Brother and his Girlfriend for their 2 year Anniversary.

I've seen lots of cards with the Owl Punch used, and thought it would be perfect for the two love birds :o)
The Owl Punch is just so cute and has so many uses, Tulips, Penguins, Rudolf to name a few.....  it's just fab!

I went with a brights palette, plus some gorgeous Crumb Cake.
The base is Tempting Turquoise and I added a Whisper White backdrop that I created a cloudy sky on with the Scalloped Circle Punch and Tempting Turquoise ink with a dauber.
I made a male and female owl and added in a little love heart in Melon Mambo.  The Old Olive 1/4" Grosgrain Ribbon acts like a branch for them to sit on.
The sentiment is from Something to Celebrate (Level 2 Hostess) - I used this a lot, it's just great for so many occasions.  I punched it out using the Large Oval Punch and mounted it on a Melon Mambo Scalloped Oval.


The Details: 
Card / Paper - Tempting Turquoise / Whisper White / Early Espresso / Crumb Cake / Melon Mambo / Tangerine Tango / Brights DSP
Stamps / Ink - Something to Celebrate / Melon Mambo / Tempting Turquoise
Embellishments -1/4" Old Olive Grosgrain Ribbon
Tools - Two-Step Owl Punch / Large Oval Punch / Scallop Oval Punch / Scallop Circle Punch / Glue Dots / Snail / Dimensionals / Trimmer / Stampin Scrub and Mist / Sponge Dauber

Saturday 4 June 2011

Stamping 411 - two challenges in one day - it's the weekend!

I've been busy card crafting this afternoon while my lovely other half re-felts the shed roof in the scorching sunshine!  I'm sure there will be a sun burnt head later on, glowing away!!!!

I took myself to my craft room and decided to have a go at a couple of Saturday Challenges.
The first was the monochrome colour challenge, and this is a sketch challenge from Stamping 411

I went for a completely different look and feel with this card, turning to the Springtime Vintage DSP and Four Frames stamp set, with a little Baby Blossoms stamp thrown in for good measure :o)


I went with a neutral base of Crumb Cake and added the strip of DSP outlined by Pear Pizzazz card, one side of which was punched with the Eyelet Border.  The frame was stamped in Basic Gray with the sentiment added from Clearly For You.  I used Aqua Painters with Rose Red and pear Pizzazz to colour this.  The Baby Blossoms down the right hand side of the card are just stamped in Versamark ink to contrast against the Crumb Cake.  I added a frame to the sentiment in Rose Red and popped it onto the card with Dimensionals.


I think two posts today should make up for my lack of posts since Wednesday.  My inspiration seemed to get up and go for a few days!  I can guarantee that there will be more posts for the next few days though :o)


Right, off to sort myself out before I head off to babysit my nephew this evening.  He'll probably be sleeping, the little darling......  he's such a cutie!


The Details: 
Card / Paper - Crumb Cake / Very Vanilla / Rose Red / Pear Pizzazz / Springtime Vintage DSP
Stamps / Ink - Four Frames / Baby Blossoms / Clearly For You / Basic Gray / Versamark / Pear Pizzazz / Rose Red
Embellishments - None
Tools - Decorative Label Punch / Eyelet Border Punch / Aqua Painter / Snail / Dimensionals / Trimmer / Stampin Scrub and Mist